Everyone has an opinion about fertility right now. It shows up in politics, in streaming dramas, and even in casual celebrity pregnancy chatter.

When headlines focus on courts and policy shifts, it’s normal to ask a practical question: what can I control this cycle?
Thesis: If you’re considering ICI at home, the goal is simple—make one clear plan, avoid common money-wasters, and choose the next step that matches your body and budget.
Start here: an “if…then…” decision guide for ICI at home
If you want the lowest-cost fertility option, then start with a clean ICI setup
At-home insemination (ICI) is often discussed as a lower-cost alternative before jumping to clinic care. It’s also a way to try at home when access feels uncertain or delayed, which is a theme that keeps surfacing in recent reproductive-rights coverage and legal updates.
Keep expectations grounded. A home insemination kit can reduce mess and improve consistency, but it can’t fix timing problems, sperm issues, or ovulation challenges.
Spend-smart focus: pay for what reduces errors (clean handling, easy placement, clear instructions). Skip extras that don’t change outcomes.
If timing is your biggest risk, then build a “no-wasted-window” routine
Most failed cycles at home aren’t from doing something “wrong.” They’re from missing the fertile window or guessing it too broadly.
- If your cycles are predictable, then ovulation predictor kits and a simple calendar can be enough.
- If your cycles are irregular, then consider getting medical guidance sooner, because timing can become expensive fast.
- If you’re data-driven, then track a few signals consistently rather than chasing every app feature.
Some people look to tech for help with predictions. If you’re curious about how modern tools “learn” patterns, see home insemination kit. Still, your body isn’t a movie plot with perfect foreshadowing—use tools as support, not as certainty.
If you’re comparing ICI vs IVF, then decide what you’re actually buying
Pop culture loves a dramatic arc: one big decision, a montage, a happy ending. Real fertility choices are more like a season of TV—many small calls, and you want fewer cliffhangers.
- If you choose ICI, then you’re buying convenience, privacy, and lower upfront cost.
- If you choose IUI, then you’re paying for clinical placement and often more structured monitoring.
- If you choose IVF, then you’re paying for lab work, medication, and higher-intensity care that may be appropriate for specific situations.
There’s no virtue in skipping steps that your situation truly needs. There’s also no prize for rushing into high-cost care before you’ve tried a well-timed, well-executed plan.
If donor sperm is involved, then prioritize sourcing and screening over “hacks”
Legal and policy conversations around reproductive health can feel noisy. Meanwhile, your immediate risk is usually more basic: unclear agreements, unclear screening, and unclear expectations.
If you’re using a donor, then consider written agreements and reputable sourcing. Local rules vary, and the practical realities can change based on where you live.
If you want to avoid common mistakes, then use this quick “don’t waste a cycle” checklist
- Don’t rely on one random day “mid-cycle” if your ovulation varies.
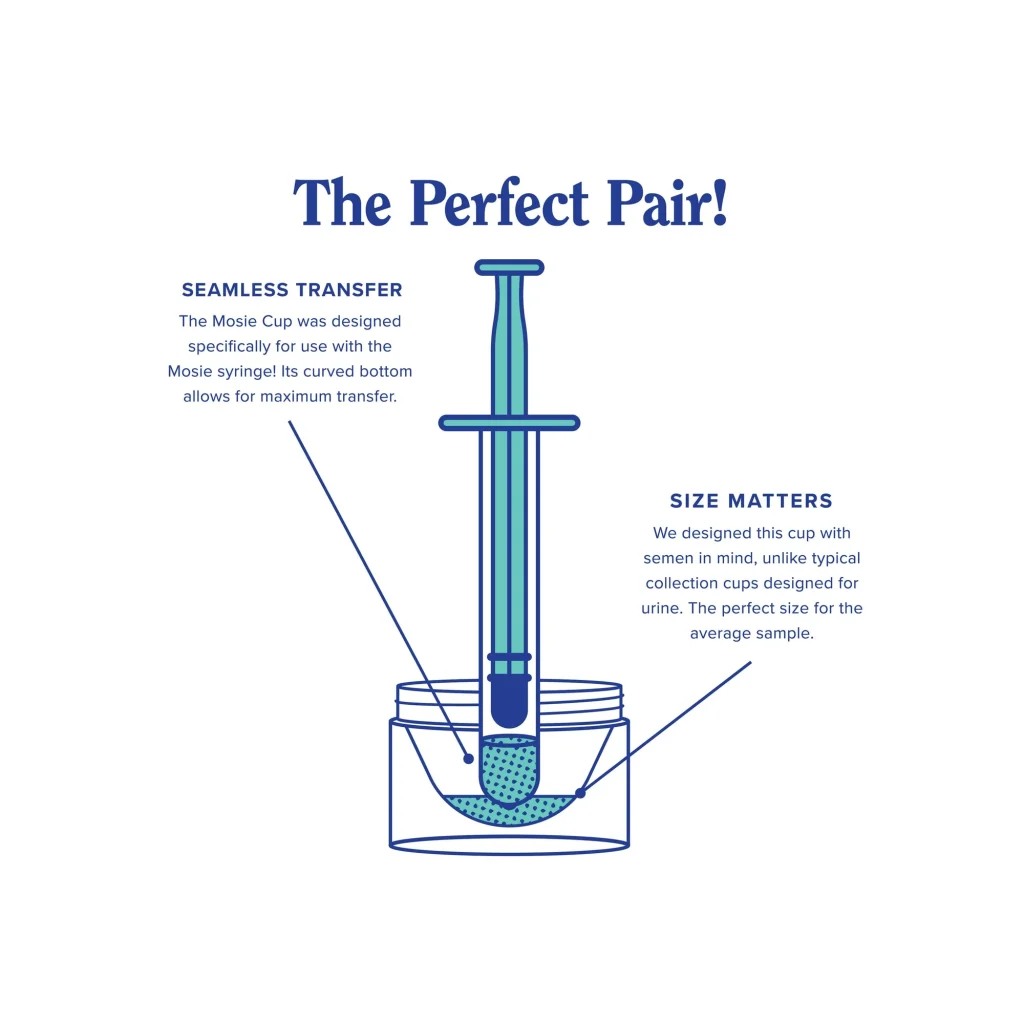
- Don’t use anything with a needle. ICI is not an injection.
- Don’t introduce scented products or harsh cleaners into the process.
- Don’t change five variables at once; you won’t know what helped.
- Don’t ignore pain, fever, or unusual symptoms—pause and seek medical care.
FAQ: fast answers people search before buying a kit
Is ICI the same as IUI?
No. ICI is vaginal placement near the cervix. IUI is intrauterine placement in a clinic.
Do home insemination kits work?
They can help with consistency and cleanliness. Outcomes still depend on timing and fertility factors.
What day should I do ICI?
Many people aim for the fertile window around ovulation. If timing is unclear, ask a clinician for personalized guidance.
Can I use a syringe from a pharmacy instead of a kit?
Some try, but it’s easy to choose the wrong type or create avoidable mess or irritation. Purpose-built options are designed for this use.
When should we stop trying at home and consider a clinic?
If you’ve had multiple well-timed cycles without success, or you have known risk factors, a clinic can offer testing and options like IUI/IVF.
Is at-home insemination legal?
It depends on location and donor circumstances. If a donor is involved, legal advice may be worth the cost.
CTA: choose a simple setup you can repeat
If you’re trying ICI at home, consistency matters more than perfection. A kit can help you repeat the same clean routine cycle after cycle.
at-home insemination kit for ICI
How does at-home insemination (ICI) work?
Medical disclaimer: This article is for general education only and is not medical advice. It does not diagnose, treat, or replace care from a qualified clinician. If you have pain, fever, abnormal bleeding, known fertility conditions, or questions about medications, timing, or infection risk, contact a licensed healthcare professional.