


Is a home insemination kit actually worth trying before IVF?
What matters more: timing, tools, or technique?
And what are people missing that quietly wastes a cycle?
Yes, ICI (intracervical insemination) can be a practical first step for some families, especially when intercourse isn’t an option or you want a lower-cost path before clinic care. Timing is the big lever. Tools and technique come next. The most common cycle-waster is guessing ovulation, then doing everything else “right” on the wrong day.
Also, DIY fertility is having a cultural moment. Between celebrity pregnancy storylines getting written into TV shows, and headlines about reproductive health litigation, more people are asking what’s possible at home—and what could backfire if you skip paperwork or consent basics.
Quick overview: what ICI is (and isn’t)
ICI means placing semen in the vagina near the cervix using a syringe (no needle). It’s different from IUI, which is a clinical procedure that puts washed sperm into the uterus.
ICI is often discussed as a budget-friendly option because it can reduce clinic visits. It can also help couples dealing with erectile dysfunction, vaginismus, pain with sex, scheduling conflicts, or when using donor sperm.
Medical disclaimer: This article is educational and not medical advice. It can’t diagnose or treat conditions. If you have health concerns, severe pain, bleeding, fever, or a known fertility diagnosis, consult a licensed clinician.
Timing: the “don’t waste a cycle” section
If you only optimize one thing, optimize timing. People commonly inseminate too early, then feel like ICI “doesn’t work.” Ovulation is a short window, and sperm survival varies by semen quality and cervical mucus.
Pick a tracking method you can follow consistently
- LH strips (ovulation tests): Useful for many, but surges can be short. Test more than once a day if your surge is quick.
- Cervical mucus changes: Slippery, stretchy mucus can signal peak fertility. It’s easy to miss if you’re dehydrated or stressed.
- Basal body temperature (BBT): Confirms ovulation after it happens, so it’s better for learning your pattern than pinpointing day-of timing.
A simple timing target for ICI
Many people aim for insemination close to the LH surge and/or suspected ovulation day. If you’re doing two attempts, you’re usually trying to cover the window without turning it into a week-long marathon.
If your cycles are irregular, timing gets harder fast. That’s a good moment to consider a clinician visit, even if you still prefer home attempts.
Supplies: what you need (and what you don’t)
Keep the setup boring. Fancy add-ons rarely improve results. They often add confusion.
Core items
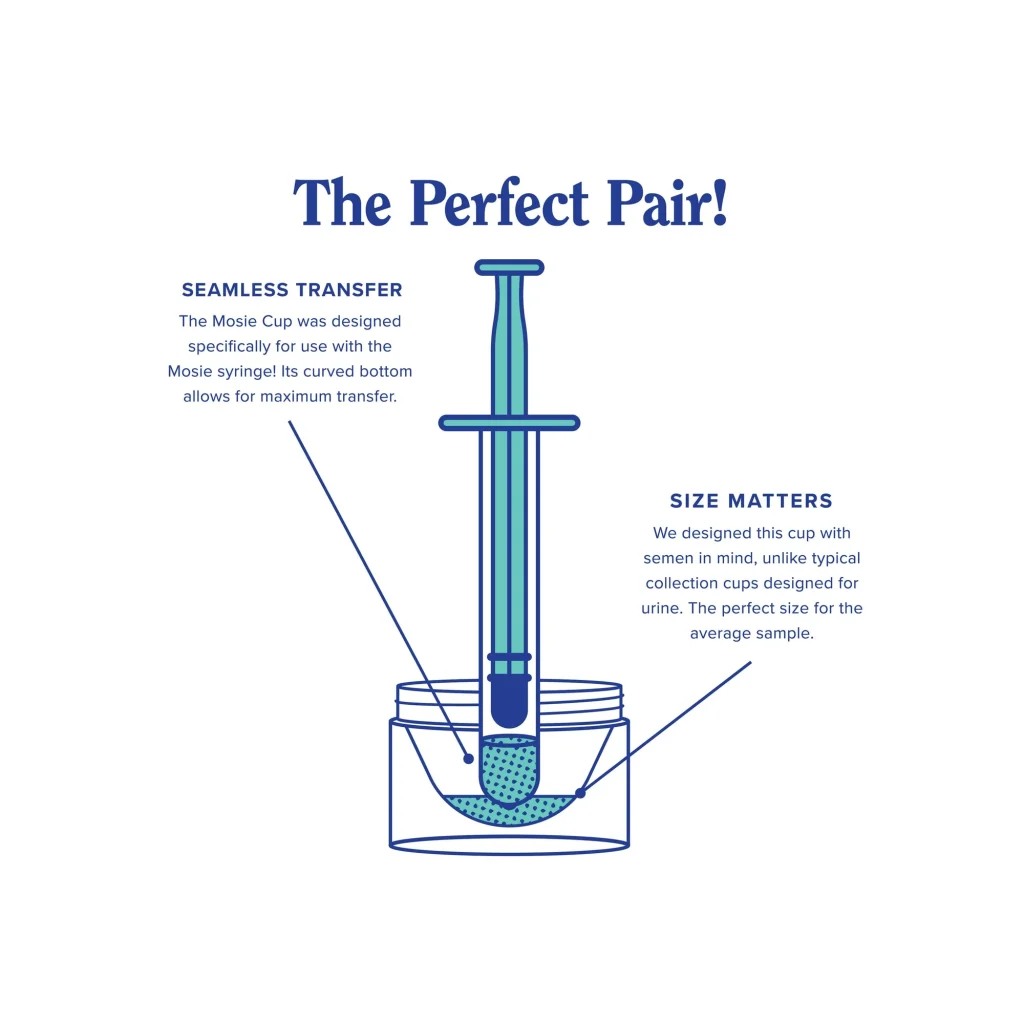
- Home insemination kit tools: A syringe designed for insemination (no needle) and user-friendly packaging.
- Clean collection container (if collecting at home).
- Ovulation tests (or your preferred tracking method).
- Water-based lubricant labeled sperm-friendly (only if needed; many lubes can harm sperm).
Skip these common “extras” unless a clinician advised them
- Unverified supplements added mid-cycle “just in case.”
- Non-sterile tools or improvised syringes.
- Harsh cleansers or douching (can irritate tissue and disrupt the environment sperm need).
You may have seen broad coverage about the fertility supplements market and research trends. That interest is real, but it doesn’t change the basics: correct timing and gentle handling beat last-minute shopping sprees.
Step-by-step ICI at home (practical, not precious)
This is a general overview. Follow the instructions that come with your kit, and use clinician guidance if you have medical complexities.
1) Set your plan before the fertile window
Decide who does what, where supplies live, and how you’ll track timing. When LH is positive, you want execution, not debate.
2) Wash hands and keep everything clean
Clean hands reduce infection risk. Use a clean surface and keep pets, lotions, and random bathroom clutter out of the process.
3) Collect and handle semen gently
Avoid heat, harsh shaking, and long delays. If you’re using donor sperm, follow storage/thaw guidance from the source exactly.
4) Get into a comfortable position
Many people choose a reclined position with hips slightly elevated. Comfort matters because tension can make placement harder.
5) Insert the syringe slowly and release slowly
Go gently. You’re aiming to place semen near the cervix, not force anything. Slow release helps reduce backflow.
6) Stay reclined briefly, then move on with your day
You don’t need a one-hour handstand. A short rest can help you feel calmer and reduce immediate leakage, but it’s not a magic trick.
Mistakes that quietly sabotage an at-home attempt
Mistake 1: Treating ovulation like a guess
If you’re relying on an app prediction alone, you may be off by days. Use LH tests and/or mucus tracking to tighten the window.
Mistake 2: Using the wrong lubricant (or too much)
Some lubricants reduce sperm motility. If you need lube, choose a sperm-friendly option and use the smallest amount that works.
Mistake 3: Improvised tools
DIY fertility already has enough variables. Don’t add another by using tools not meant for insemination.
Mistake 4: Ignoring the legal side when donor sperm is involved
Recent coverage has highlighted how parentage questions can surface after at-home insemination, especially in “gray market” arrangements. Laws vary, and outcomes can hinge on details like consent, documentation, and how the insemination was arranged.
If you want a quick starting point for what’s being discussed publicly, read more on Florida Supreme Court makes ruling in at-home artificial insemination case. Then talk to a qualified attorney in your state if donor arrangements apply to you.
FAQ: fast answers people ask right now
Why is at-home insemination suddenly everywhere?
Pop culture keeps it in the conversation—TV shows even write real pregnancies into storylines. At the same time, legal and political news around reproductive rights has made family-building options feel more urgent and more visible.
Is ICI an “IVF alternative”?
It can be an earlier step before IVF for some people. It’s not a substitute when IVF is medically indicated.
Should you add supplements to boost results?
Be cautious with last-minute changes. If you’re considering supplements, discuss them with a clinician, especially if you take other medications.
CTA: a simple next step
If you’re aiming to try ICI without burning a month on avoidable errors, start with the right tools and a clear timing plan. Browse an at-home insemination kit for ICI option that’s designed for this purpose.