On a quiet Tuesday night, “Maya” pauses a streaming show mid-episode. The plot is doing that familiar TV thing: an actor’s pregnancy gets written into the storyline, and suddenly everyone on-screen is talking about timing, bodies, and big decisions. Maya looks at her calendar, then at the unopened box on her dresser. It’s not a TV twist for her. It’s a plan.

At-home insemination (ICI) is one of the home fertility options people discuss when they want something more hands-on than “just keep trying,” but less clinical than jumping straight to IVF. Pop culture keeps pregnancy in the spotlight—celebrity rumors, new dramas about parenthood, and constant headlines about reproductive healthcare. Meanwhile, many real people are simply trying to understand what’s practical, legal where they live, and emotionally manageable.
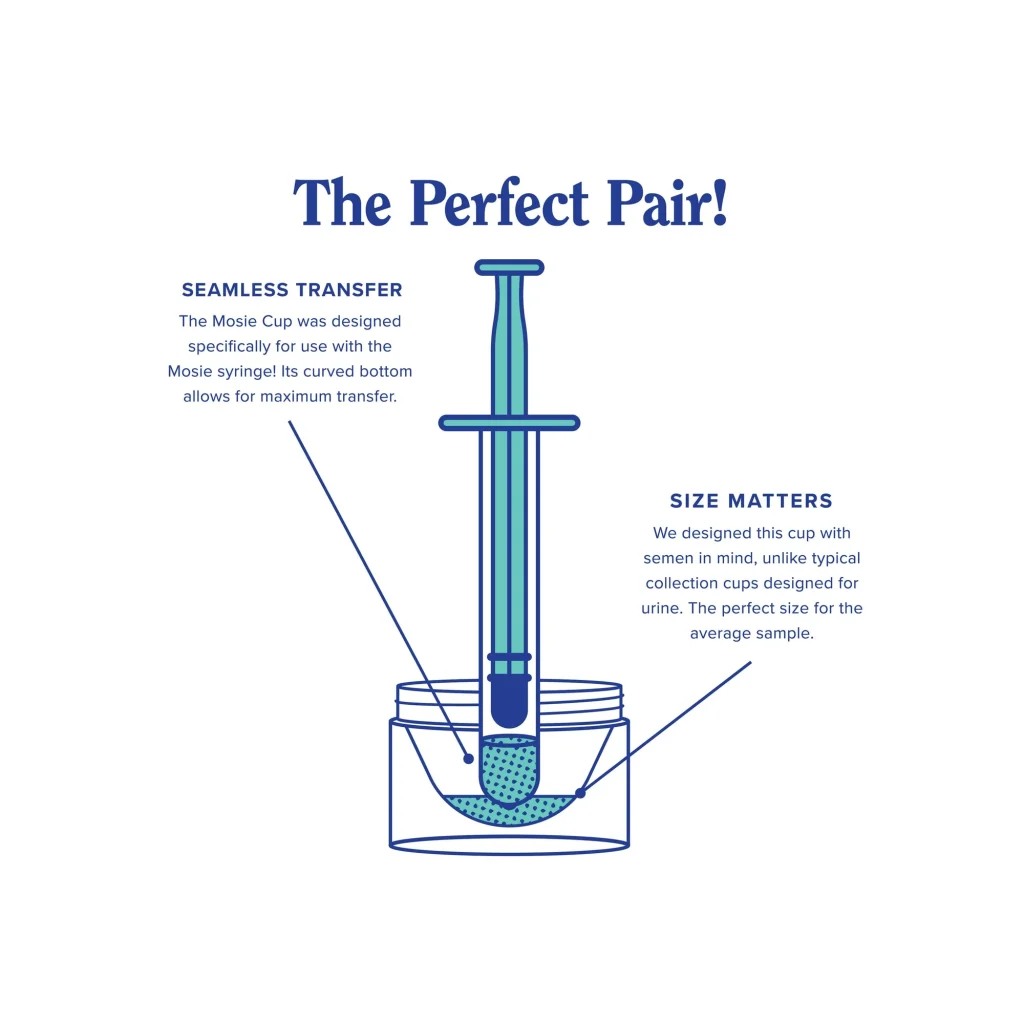
This guide focuses on technique and setup using a home insemination kit, with clear steps, comfort tips, and common mistakes to avoid.
Quick overview: what ICI is (and what it isn’t)
ICI stands for intracervical insemination, but most at-home attempts are effectively “intravaginal” placement. The goal is to place semen close to the cervix during the fertile window.
- ICI at home: Semen is placed in the vagina, typically near the cervix, using a syringe designed for this purpose.
- Not IVF: No egg retrieval, no embryo creation, no lab transfer.
- Not IUI: IUI is performed in a clinic and places washed sperm into the uterus.
One more note: conversations about reproductive rights and access can shape how people think about fertility and family-building. If you’re unsure what’s permitted in your location (especially when using donor sperm or shipping), consider checking local guidance and reputable advocacy/legal resources.
Timing that actually matters: picking your best window
If you only optimize one thing, optimize timing. Many “it didn’t work” stories are really “we missed the window.”
Use at least one tracking method
- Ovulation predictor kits (OPKs): Helpful for spotting the LH surge that often happens 24–36 hours before ovulation.
- Cervical mucus: Clear, stretchy “egg-white” mucus often signals higher fertility.
- Basal body temperature (BBT): Confirms ovulation after it happens, which can still help you plan future cycles.
How often to try
Many people aim for 1–3 attempts across the fertile window (for example: before the surge, around the surge, and/or within a day after). Your exact plan depends on sperm availability, stress level, and what’s realistic at home.
Supplies: what to gather before you start
Having everything within reach reduces anxiety and prevents rushed mistakes.
The essentials
- Syringe designed for insemination: Smooth edges, no needle. Avoid improvised tools.
- Collection container (if needed): Clean and non-toxic.
- Optional cervical-friendly speculum or mirror: Only if it helps you feel more confident. Not required.
- Fertility-friendly lubricant (optional): Only if needed for comfort.
- Clean towel, wipes, and a small trash bag: For quick cleanup.
Comfort extras (worth it)
- Pillow to elevate hips slightly
- Pad or liner afterward
- Timer or relaxing playlist so you’re not staring at the clock
If you’re shopping, start with a purpose-built option like an at-home insemination kit for ICI so you’re not guessing about basic components.
Step-by-step: at-home insemination (ICI) technique
This is a general, educational overview. Follow product instructions, prioritize hygiene, and stop if you feel pain.
1) Set the scene (privacy + clean hands)
Wash hands thoroughly. Choose a comfortable space where you can stay relaxed for a short rest afterward. Stress doesn’t help technique.
2) Prepare the sample carefully
If collecting fresh semen, use a clean container and avoid saliva or non-fertility lubricants. If using donor sperm, follow handling and thaw guidance exactly as provided by the bank or clinic.
3) Load the syringe slowly
Draw the sample into the syringe gently to reduce bubbles. Air isn’t “dangerous” in the way people fear with injections, but bubbles can make placement messier and less controlled.
4) Find a comfortable position
Common options include lying on your back with knees bent, hips slightly elevated, or side-lying. Choose what keeps your pelvic muscles relaxed.
5) Insert and place slowly
Insert the syringe into the vagina until it feels comfortably deep (not painful). Depress the plunger slowly. A gradual release can reduce leakage and cramping sensations.
6) Stay still for a short rest
Rest for comfort. Some people choose 10–20 minutes; others do less. The goal is calm, not perfection. Use a towel or liner when you stand.
7) Cleanup without overdoing it
Skip douching or aggressive rinsing. Gentle external cleanup is enough. If you feel irritation, pause and reassess products used (especially lubricants).
Common mistakes that make ICI harder than it needs to be
Rushing because you’re anxious
Fast setup leads to spills, poor placement, and tension. Build a 15-minute buffer so you can move slowly.
Using the wrong lubricant (or none when you need it)
Some lubricants can reduce sperm motility. If dryness makes insertion uncomfortable, pick a fertility-friendly option rather than forcing it.
Chasing “perfect cervix aim”
You don’t need to “hit” the cervix. Focus on comfortable placement in the vagina and good timing. Pain is a signal to stop.
Ignoring the basics of timing
A flawless setup won’t compensate for inseminating outside the fertile window. Track at least one sign (OPK or mucus) consistently.
Skipping a reality check on stress and support
Pregnancy is everywhere in the culture—TV plotlines, gossip, and big political conversations about reproductive health. That can be heavy. If you’re feeling overwhelmed, simplify the plan and ask for support from a trusted person or professional counselor.
FAQ
Is ICI the same as IUI?
No. ICI is done at home and places semen in the vagina. IUI is done in a clinic and places prepared sperm into the uterus.
How many minutes should you stay lying down after ICI?
Many people rest briefly for comfort. There isn’t one proven “magic number,” so choose a calm window that feels doable and reduces mess.
Can you use saliva or lotion as lubricant for ICI?
Avoid saliva and many standard lubricants. If you need lubrication, use one labeled fertility-friendly.
What’s the best timing for ICI?
Aim for the fertile window: the days leading up to ovulation and the day of ovulation. OPKs and cervical mucus are common tools for narrowing it down.
When should you talk to a clinician instead of trying at home?
Seek medical guidance if you have significant pelvic pain, very irregular cycles, known fertility conditions, a history of ectopic pregnancy, or prolonged unsuccessful trying.
Next step: keep it simple, then iterate
If you want a low-drama plan, start with timing + comfort + clean technique. Track what you did this cycle and adjust one variable next time, not five. That “writer’s room” approach—small edits, better outcome—often beats trying to reinvent everything at once.
Also, if you’re curious how tech shapes health conversations, it’s worth reading about the home insemination kit and how search, recommendations, and social feeds can influence what fertility advice you see.
How does at-home insemination (ICI) work?
Medical disclaimer: This article is for general education and does not provide medical advice, diagnosis, or treatment. If you have pain, bleeding, fever, concerns about infection, or questions about medications, donor sperm handling, or your fertility history, consult a licensed clinician.