DIY Baby-Making: Home Insemination Made Simple
Having a baby is one of the most exciting and life-changing experiences a person can have. However, for some couples, conceiving a child may not come as easily as they had hoped. This is where DIY baby-making through home insemination can provide a simple and cost-effective solution. In this blog post, we will discuss everything you need to know about DIY baby-making through home insemination, including the advantages, risks, and step-by-step instructions to help you get started.
Advantages of DIY Baby-Making through Home Insemination
One of the main advantages of DIY baby-making through home insemination is the cost savings. Traditional methods of conceiving a child, such as in vitro fertilization (IVF), can be extremely expensive and may not be a feasible option for everyone. With home insemination, you can skip the costly medical procedures and perform the insemination in the comfort of your own home.
Another advantage is the convenience. Many couples may feel uncomfortable or self-conscious about undergoing medical procedures for conception. With DIY baby-making, you have complete privacy and can perform the insemination at your own pace and in a comfortable setting.
In addition, home insemination allows for more control over the process. You can choose the timing and frequency of insemination, which can be particularly helpful for couples with irregular ovulation cycles. It also gives couples the option to use fresh sperm from a known donor, rather than relying on frozen sperm from a sperm bank.
Risks of DIY Baby-Making through Home Insemination
While DIY baby-making through home insemination may seem like a simple and risk-free option, there are still potential risks to consider. The main risk is the lack of medical supervision. Without a doctor overseeing the process, there is a possibility of incorrect technique or contamination, which could lead to infection or other complications.
Another risk is the possibility of using sperm from an unknown donor, which may increase the risk of genetic diseases or disorders. It is important to thoroughly research and screen any potential donors to ensure the health and safety of the baby.
Step-by-Step Guide to Home Insemination
Before beginning the process of home insemination, it is important to consult with a doctor to ensure that you are a good candidate and to rule out any potential fertility issues. Once you have the green light, here is a step-by-step guide to DIY baby-making through home insemination:
Step 1: Track Ovulation
The first step is to determine when you are ovulating. This can be done through tracking your menstrual cycle, using ovulation predictor kits, or monitoring your basal body temperature. Ovulation typically occurs around day 14 of a 28-day cycle, but it can vary for each woman.
DIY Baby-Making: Home Insemination Made Simple
Step 2: Gather Supplies
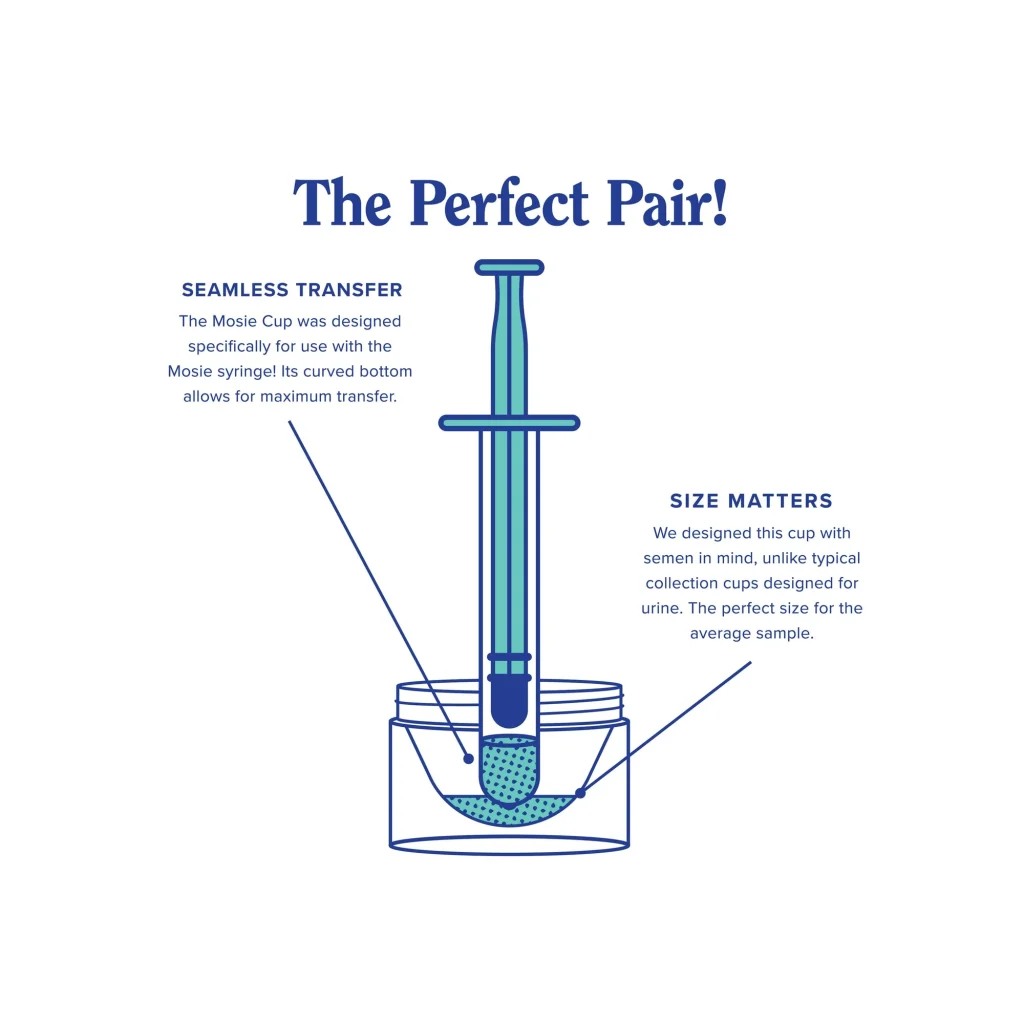
You will need a few supplies for the insemination process, including a sterile syringe, a sterile cup, and a sterile specimen jar. These can be purchased at most drugstores or online. It is important to ensure that all equipment is sterile to avoid any potential contamination.
Step 3: Collect the Sperm
If using a known donor, the sperm can be collected in the sterile specimen jar. If using frozen sperm from a sperm bank, it will need to be thawed according to the instructions provided. It is important to note that sperm can only survive for a few hours outside of the body, so it is crucial to time the insemination correctly.
Step 4: Prepare the Insemination Site
The insemination site should be clean and comfortable. Some couples prefer to use a bed or couch, while others prefer the bathroom. Make sure to lay down a towel or sheet to protect any surfaces from potential spills.
Step 5: Insert the Sperm
Using a sterile syringe, extract the sperm from the specimen jar and insert it into the vagina. This should be done as close to the cervix as possible to increase the chances of conception. It may be helpful to use a mirror or have a partner assist in the process.
Step 6: Rest and Relax
After the insemination, it is important to remain lying down for 15-20 minutes to allow the sperm to travel to the cervix. This will increase the chances of conception. It is also important to stay relaxed and avoid strenuous activities for the rest of the day.
Step 7: Repeat the Process
For the best chances of conception, it is recommended to repeat the insemination process for a few days in a row, starting a few days before ovulation and continuing until a day or two after ovulation. This will provide the sperm with multiple opportunities to fertilize an egg.
Summary
DIY baby-making through home insemination is a cost-effective and convenient option for couples struggling with fertility issues. It allows for more control over the process and provides privacy for those who may feel uncomfortable with medical procedures. However, it is important to consider the risks involved, such as lack of medical supervision and potential genetic concerns. By following a simple step-by-step guide and consulting with a doctor beforehand, couples can increase their chances of conceiving a child through home insemination.
Leave a Reply